文字入力部品として UITextField と UITextView の2つがある。
UITextField の方は borderStyle プロパティを設定して簡単に見た目を変更することができる。
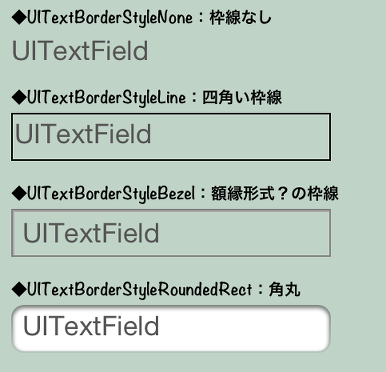
こっちを採用しようとしたが、文字を1行しか入力することができない (。´Д⊂)
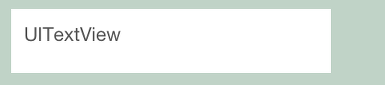
ので、複数行入力可能な UITextView を使用してプログラムで見た目を変更してみた。
#デフォルトの見た目
#準備
QuartzCore フレームワークのインポート
#import <QuartzCore/QuartzCore.h>
#まずは、枠線と角丸の追加
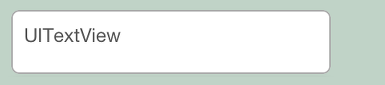
UITextView *textView = [[UITextView alloc] initWithFrame:CGRectMake(10, 10, 200, 40)];
textView.text = @"UITextView";
textView.layer.borderWidth = 1.0f;    // 枠線の幅
textView.layer.cornerRadius = 5.0f;   // 角の丸み
[self.view addSubview:textView];
#そして、影を追加
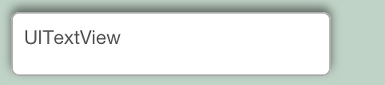
UITextView *textView = [[UITextView alloc] initWithFrame:CGRectMake(10, 10, 200, 40)];
textView.text = @"UITextView";
textView.layer.borderWidth = 1.0f;    // 枠線の幅
textView.layer.cornerRadius = 5.0f;   // 角の丸み
textView.layer.shadowOpacity = 0.5f;  // 影の濃さ
textView.layer.masksToBounds = NO;    // これがないと影が表示されない
[self.view addSubview:textView];
ひとまずデフォルトよりは、よさげだけど、最終的には UITextField の角丸(UITextBorderStyleRoundedRect)と同じような見た目に変更したい!(それはまた次回)
ピンバック: UITextView の見た目を変更する(2) | UB Lab.